Apple devices are basically very secure and set up for only one person’s using at a time, so that the files and other data remain secure and private. To keep things working that way, Apple has in fact made changing an Apple ID in an iPhone little bit difficult. Experts will certainly find the easier ways around but for people who aren’t really much into iPhones or the iOS operating system could have difficult times adding a new different Apple ID into the iOS device they are using. To prevent theft of iPhones and iPads, the process was made complicated intentionally. Read this article to learn how to change Apple ID on iPhone or iPad easily.
Must Know Before you Change Apple ID on iPhone or iPad
Before starting the procedure to change Apple ID on iPhone and iPad, you should ensure something.
- Make sure your passwords are different: Different email addresses should have different passwords. Multiple email addresses that belong to the same person with same password(s) is a fatal mistake on the internet.
- You can access the new email address: To change the Apple ID to a new email address, you must make sure that you can access that email ID and retrieve emails off the inbox. Apple would send a confirmation email and information emails later and active access is required for all these features.
- The new email shouldn’t already be an Apple ID: An email address could be used as an Apple ID only once, thus the email you want to make your new Apple ID shouldn’t be an Apple ID already. If it is, make sure you have a dummy email to temporarily make that an Apple ID while you make the shift.
#1: Change Apple ID Email from one to Another
To change Apple ID on iPhone or iPad you can just change the email address associated with your Apple account. To change Apple ID email, follow the steps below:
Sign in to your Account to Change Apple ID Email
Following are the procedures to change an Apple ID from one email to another email address. The whole process is going to take only a few minutes.
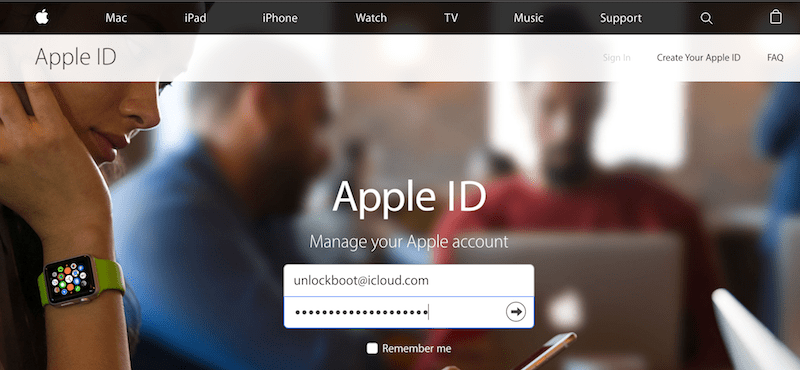
- Open a web browser in your computer and visit appleid.apple.com. Once the webpage completely loads up, there should be a section named ‘Manage your Apple account’. Sign in using your current Apple ID and password.
- On the right side, click Edit next to your current email address listing. This portion is also marked by ‘Apple ID and Primary Email Address’ title.
- However under the Apple ID email address section, enter your new Apple ID email.
- Click save and Apple should take a while to verify the entered email address, and would also notify the user if there’s an Apple ID associated with that email address already.
- If everything is okay, click on ‘Save’. Wait a few minutes and you should receive an email with subject ‘Verify your Apple ID’ in your new Apple ID email’s inbox.
- An activation link or code should be included within the email. Customer needs to click on the link or submit the code to get their new Apple ID verified and up.
- Once the new email is activated as an Apple ID, the old one gets discarded from the customer’s ID information.
- Login to any Apple service using the new Apple ID now.
#2: Create a New Apple ID then Change it on your iPhone or iPad
Another method to change Apple ID on iPhone or iPad is to create new Apple ID and remove the old one. To do that, follow the steps mentored below.
This method can be used if you want to add a completely new Apple ID to your iPhone, iPad or iPod Touch. You can use this method if you don’t have access to your previous email, you use this Apple ID for more than one device or you want to add a new Apple ID because you bought a used iPhone. Follow our guide below to replace your old Apple id with a new one:
- To change Apple ID on iPhone or iPad you need to sign out from the current Apple ID, you need to go to Settings –> iTunes & App Store –> tap on the current Apple ID –> Sign Out.
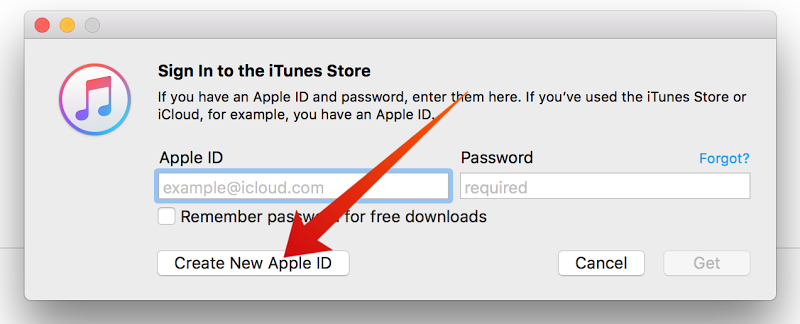
- Now you need to create a new Apple ID. You can follow our guide on how to create Apple ID without credit card.
- After you have created the new Apple ID, just go to Settings –> iTunes & App Store and enter your new Apple ID (email & password).
Conclusion: Changing the Apple ID to a new email address is quite easy as long as the new email address wasn’t used as an Apple ID. Even if it is, one can certainly take a workaround.


