Alternative carriers and unlocked handsets have recently boomed in popularity. Nowadays, almost every firm creates an unlocked model that can be purchased via Amazon or from their website directly. You can also sometimes get your hands on the necessary software and parts to use the device on any GSM network worldwide.
And if you don’t own a phone that’s associated with a carrier via a contract you’re free to test other network carriers and decide what works best for your needs. Reshuffling things and giving something new a go when it comes to phone service is quite pain-free and simple, but may require you to understand how an APN is set on a device. With that said, here’s a bit of an explanation about what APN is and how to add or change one.
What Does an APN Imply?
Simply put, Access Point Name or APN is the name given to the settings that smartphones read to create a connection to the gateway between the public internet and your network carrier. Your vendor goes through these settings, then their network verifies the authenticity of IP addresses before connecting to the right secure gateway, and inquire if you want to form a connection through a virtual private network. The carrier side does all the heavy lifting, but users need to ensure the ideal settings are configured to be on the network they need, according to the way they need to form a connection.
Network Settings Required by Your Device to Connect to Your Carrier Are Inside an APN
Based on how the network of your carrier is set up, various settings are a must. The rest, however, can be slightly modified to make changes for some parameters, but for most people, they’ll need to apply the same settings as requested by their carrier. Fortunately, most devices have an APN setting that’s default and works for calls on an automatic basis. That makes them really useful if you want help you’re using Verizon, T-Mobile, Sprint, Metro PCS, Boost, Virgin, US Cellular, AT&T or any other carrier in the world. Nothing else functions correctly and the APN has to be manually added.
The unfortunate thing is that the software can be customized on any device sold by the carrier, and the ability to modify the VPN can be eliminated. Even when the handset is unlocked. And though there might be a workaround posted somewhere on the web, there’s a likelihood hat you won’t be able to use the device on any other network carrier. Hence, we recommend purchasing your handset from some other person or company.
Steps to Change APN Settings on your Android Device
Before anything else, you need to discover the correct APN settings for the network you wish would function. This can be found on the carrier’s website under support pages. The following example shows what the settings typically look like (we’re giving T-Mobile’s example):
- Navigate to Settings -> Connections -> Mobile Networks -> Access Point Names.
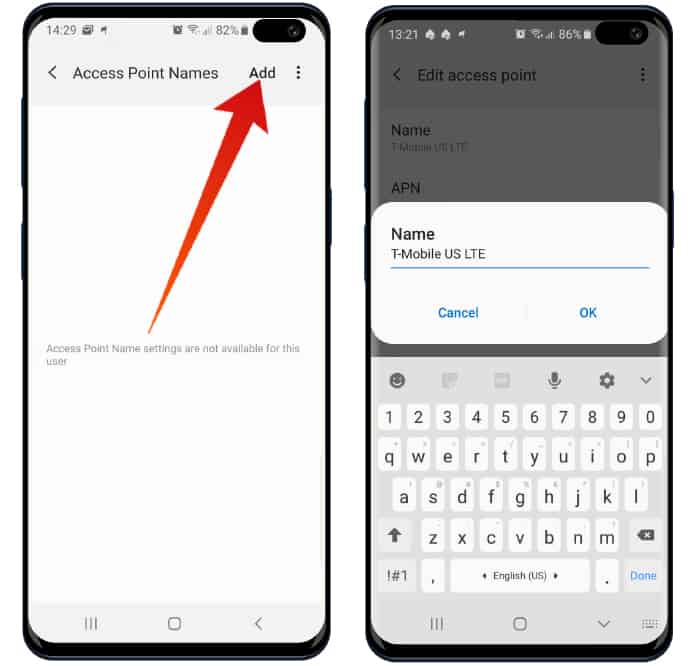
- Tap on the Add button to add the new APN (You can delete the unused APNs first).
- Add the following APN settings:
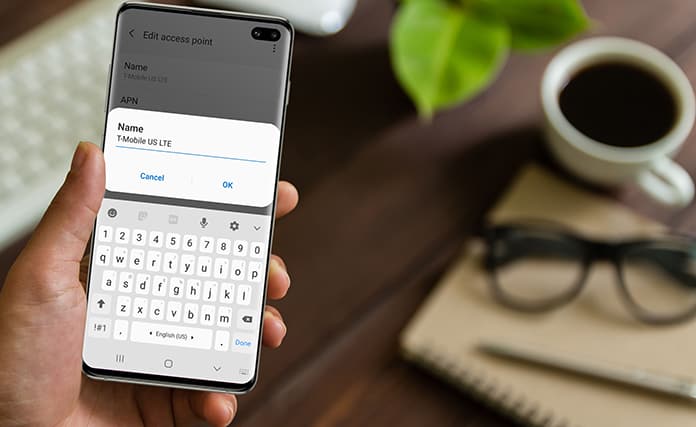
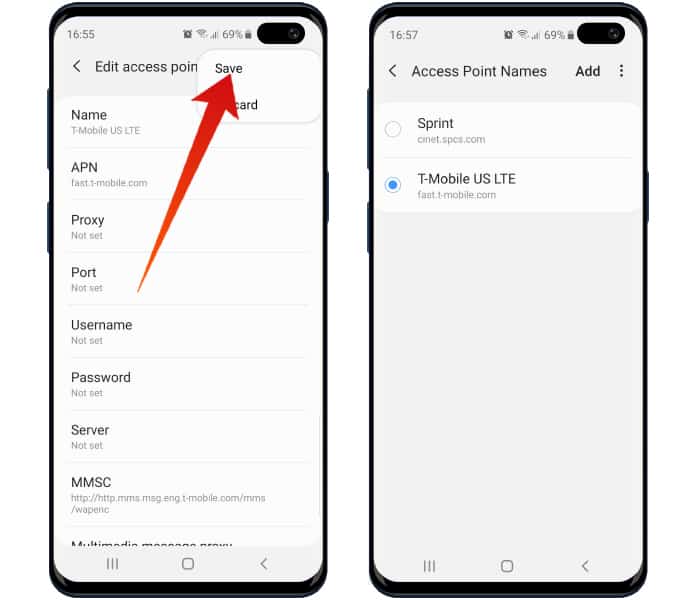
- Name: T-Mobile US LTE
- APN: fast.t-mobile.com
- Proxy: <Not set>
- Port: <Not set>
- Username: <Not set>
- Password: <Not set>
- Server: <Not set>
- MMSC: http://mms.msg.eng.t-mobile.com/mms/wapenc
- MMS proxy: <Not set>
- MMS port: <Not set>
- MMS protocol: WAP 2.0
- MCC: 310
- MNC: 260
- Authentication type: <Not set>
- APN type: <Not set> OR Internet+MMS
- APN protocol: IPv4/IPv6
- APN roaming protocol: IPv4
- Enable/disable APN: <greyed out unless there are multiple APNs>
- Bearer: Unspecified
- Tap Menu > Save.
- Tap the desired APN profile you want to use by tapping on the bullet point (filled with blue next to the selected APN profile).
The above settings are needed for entering a brand new APN that can be used for MMS and data via T-Mobile’s service. You’ll just need to locate them and enter the details. The process, of course, will be different based on who made the device, but it’s mostly going to be in “wireless & networks” part of your settings. For Samsung and other android devices, users should navigate to the settings of the APN and put in the APN information. The details can be found through a Google Search or on the carrier’s website. Also, feel free to modify the steps you’re going to read below Here are some useful links – from the most used carriers in the US:
- AT&T APN Settings
- Verizon APN Settings
- Metro PCS APN Settings
- Cricket APN Settings
- US Cellular APN Settings
Look for the “Access Point Names” setting that might be residing inside another setting like “Cellular Networks.” That’s where it is on Moto Z or Pixel, and could be similar for your device. Of course, you won’t cause harm to your handset by just taking a view of Settings.
Once the Access Point Names section is discovered, tap to open.
Now you should be presented with a list with at least one APN on it. If things don’t work with the existing one, try adding another. But don’t try to remove or make changes to the existing one. Just add a new one to use after you’re done. Also, at the page’s top, or inside the menu, press the “plus” sign to open Edit access point. This is where the settings you get from the website of your carrier need to be entered.
Remember these two things at this point:
- You don’t need to fill every field in the “Edit access point” window. Only enter the details that your carrier vendor provides, and leave the rest of the fields blank.
- Type all details in the exact same manner as you received them from carrier. For instance, default,supl,hipri is not the same as default, supl, and hipri because of the word “and” between them. Because the system of your carrier is set to recognize expected values, any minor differences will break things up.
Once you’ve entered the settings provided by the network carrier, save the APN by pressing the three dots at the top right corner or in the phone’s menu and choosing the option that says “Save.”
After the APN info is saved, head back a screen to the place where you saw the list earlier. Once done, tap the new settings for the APN to activate them. The data connection of your phone will be lost for a while as it forms a connection to the new network with the new settings. If the new connection isn’t formed, restart your device to make another attempt.
In some instances, your carrier provider may have “two” APNs for which details need to be entered. This can be because of the fact that they’re using two distinct gateways for multimedia messaging and other data that’s not a part of your data plan. If that happens to be the case, you’ll be provided with the complete explanation of both settings on the support site of the carrier. In most instances, however, there’ll be just one APN.
That’s all there’s to it. Now you should be able to use the device for MMS, SMS, data and calls. Make sure to set up data savers or any warning alerts as your phone might need to track how much data is being consumed and if you’re close to your cap.


