Honestly, sometimes I think there is no use of spending such huge bucks if you are not a bit more techie. You have to be that little freaky to get the full of those stupendous iPhone specs. Going with orthodox way of using the devices is pretty boring and unsatisfying as well when you come across with instances like Bypass iCloud Activation lock iOS 12.3.1, 12.3, 12.2, 12.1.3, 12, 11.4.1, 11.3.1, 11.3, 11.2.6, 11.1.2 – 11, 10.3.3, 9.3.5, 7.1.2 and below on iPhone XS MAX, XS, XR, 8 Plus, 8, X, 7 Plus, 7, 6, 6S, 6+, 6S+, 5S, 5C, 5, 4S, iPad or iPhone 4.
But, I know you are not among those who have the only option of feeling bad. I know you try, and the good news is that you are at right place now. You can now bypass iCloud activation lock (Find My iPhone) through a ritual DNS server by changing your WIFI DNS IP Address.
Bypass iCloud Activation Lock on iPhone or iPad
Table of Contents:
- Video Guide to Bypass & Remove iCloud Activation Lock
- Alternative Methods to Remove iCloud Account from iPhone or iPad
- Check iCloud Activation Status Before Purchase the Device
- Ask Apple to Help you to Reset your iCloud Locked iPhone
However, it is here to mention that this is not an everlasting option for you. Still, you can let functioning in to the product to get the important details. Apart from this, you can take the activation locked product in to account to bypass iCloud activation lock and enjoy internet, games, apps, videos, etc. on your iPhone or iPad with iOS 9.3.5 installed.
Don’t have any baffle in mind; the procedure has been applied with iPhone 4, 4s, 5, 5C, 5S, 6, 6 Plus, 6S, 6S Plus, 7, 7+, 8, X and the other devices like iPad, iPod Touch, iPhones on the current 12.2, 12.1, 11.4.1, 12, 11.3.1, 11.0 – 11.2.6, 10.3.2, 10.3, 10.2, 10, 9.3.5 – 7.1.2 firmware. In short, it can be pretty handy for you. Below here we have mentioned the step by step iCloud activation bypass procedure to get the job done. Have a look and try it out!
How to Bypass iCloud Activation Lock – Video Guide
Steps to Bypass iCloud Activation lock on iPhone and iPad:
- First change the DNS server in your WIFI settings as 78.109.17.60 or use other IP address (USA: 104.154.51.7, Europe: 104.155.28.90, Asia: 104.155.220.58).
- Now take your locked idevice and move to the last activation step and pick the ‘Activation Help’ option that is going to boot you through the ritual site. Now you have the interesting options like playing games, watching videos, internet, etc.
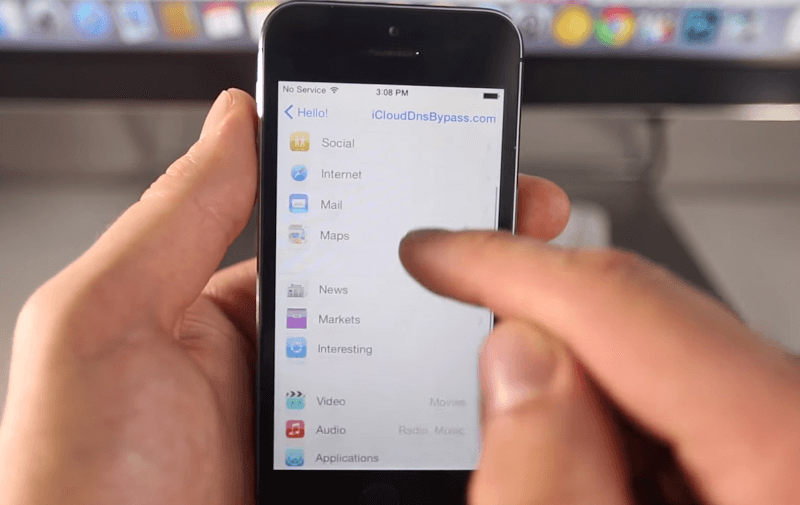
Steps To Completely Bypass iCloud Activation
- Move over the ‘Applications’ option and tap the ‘Crash Test 1’. This is going to reprising your stuff.
- Move over to the WiFi settings and hit the ‘i’ and pick ‘Manual’ option over the ‘http proxy’ zone.
- No list thirty distinct emoji icons to the ‘Server’ and type ‘8888’ over the ‘Port’ zone.
- Now hit back and then next, and move over the slide to unlock. Then hit the language options. Don’t just click; rather click with an effort for some minutes so that it can be booted over the display.
- As the home screen becomes available, you can now open three options, Phone, Newsstand and Facetime.
- It is here to mention that now you have to put again a little more effort by holding Power and Home button each time you open an application to restart the product and facilitate the process.
- Now go through Facetime where you can have the mail of the last user to whom you can contact through mail and enquire whether the device be taken of the iCloud. If you are not finding the mail, then continue the iCloud bypass process and go through the iPhone application to witness the contact number of the concerned person.
Alternative Method to Remove iCloud Account from Activated iPhone
If you own an iPhone or iPad and you forgot it’s iCloud password, then you can jailbreak it and remove the current iCloud account with iFile or other file browsing app. Here’s a detailed guide on how to remove iCloud account from iPhone.
In a case you have the purchase proof documents for your device, then you can contact Apple support of your country. Just call them on 1-800-676-2775, and explain your situation to them. They will ask you to send the proof of purchase to the iCloud department. After they verify the documents, the iCloud account will be removed from your device and you can add a new account.
Lookout for iCloud Activation Before Purchasing an iPhone From Another Person
Almost 50 percent of iDevices are sold legally and they feature Activation lock. In particular cases, the iCloud lock isn’t removed by the seller. It can happen accidentally, but there are true stories of sellers asking for more money to remove the lock after the transaction has taken place. To avoid fraud, you should see if the device is locked or not before you make a purchase.
Before purchasing an Apple Watch, iPod touch, iPad, or iPhone from an Apple reseller (authorized), it is best to ensure it has been erased and not connected with the account of the previous owner. Also, you need to ask them whether or not the Activation Lock has been removed.
Switch on the device. If you see the Home screen or lock screen, it means the Activation Lock is still there. Then, request the seller for device erase – Settings > General > Reset > Erase All Content and Settings. If you’ve asked for the last seller’s Apple ID credentials, it’s likely the device is still connected with their account.
In case you can’t get in touch with the previous owner, ask them to use icloud.com to remove their account from the device. If you’re asked to “Set up your iPhone/iPad” as you switch the screen on, it means the Activation Lock is deactivated.
Analyzing iPad or iPhone iCloud Status Before Making a Purchase
Another red flag to keep a lookout for when buying an iPhone from an unknown individual is to ensure you’re not buying a stolen handset. Previously the Activation Lock tool could be used to see the status of any iOS device. However, the feature has been eliminated after reports said Chinese hackers were using it for illicit activities. Fortunately, the status of any device can still be checked.
Just open stolenphonechecker.org and enter the IMEI for the handset you want to buy. The tool compares the entered IMEI against multiple source databases and offers quick results. IMEI is usually printed on the devices’ back. If you don’t see it there, you can get it from the Settings app.
If you are still reading, we think you know the pain when people find their device with iCloud lock activated. So, unlock your iCloud before selling it.
Essential things that should be done before giving away or selling your iDevice
There are specific things you need to be aware of before giving away or selling your handset. Firstly, you should delete your personal details. Ensure not to manually remove calendars, reminders, contacts, photos, documents and other information on iCloud if you’re signed into iCloud. Doing so will wipe out your information from servers of iCloud and all devices where your iCloud account is active. If Apple Watch is paired with iPhone, unpair it.
Do a iTunes or iCloud Backup
Make sure to perform a backup of your handset. Connect iPhone to Mac/PC and launch iTunes. Next, choose your device from the top left menu, and click “Back Up Now.”
Sign out of iCloud and iTunes & App Store
On your handset running iOS 10.3 or above, go to Settings > (your name). Then, scroll down and tap “Sign Out.” Enter Apple ID and password and choose “Turn Off.” If the device is running iOS 10.2 or an earlier version, tap Settings > iCloud > Sign Out. Next, tap “Sign Out” one more time, then choose “Delete from My {device}” and enter Apple ID password. Now, go to Settings > iTunes & App Store > Apple ID > Sign Out.
Erase All Content & Settings
Next, go to Settings > General > Reset > Erase All Content and Settings. If you have Find My iPhone enabled, you may be asked to input your Apple ID and password. If asked to enter your Restrictions passcode or device passcode, do that. Then tap “Erase [device].”
What If You Don’t Have Your iDevice?
If you didn’t follow the steps above before giving away or selling your iDevice, tell the new device owner to wipe out all content and settings by going to Settings > General > Reset > Erase Content and Settings.
In case, the Find My iPhone and iCloud are active on the device, go to icloud.com. Then use your Apple ID and password to sign in. Next, choose Find My iPhone > All Devices > select the device, and click Erase. After the device is erased, click “Remove from Account.”
Note: If you’re unable to execute any of the steps above, change the Apple ID account information. Though your personal information stored on the device won’t get removed, it will prevent the new owner from eliminating your information from iCloud.
If you’re using Apple Pay, you can go to iCloud.com to remove your debit or credit cards. Go to Settings and see which devices are utilizing Apple Pay. Then, click the device that’s next to Apple Play and click “Remove.”
What if you are in a scenario where you’ve forgotten your Apple ID account password? Will you go for the removal of Activation Lock straight from your device? Well, no.
Here’s What You Should Do If You’ve Forgotten Apple ID or password:
Apple can assist you in finding your Apple ID in case you’ve forgotten it. You get the option to reset your password from your Apple ID account page or from your device.
One of the best ways to never forget the ID is to utilize password account managers. You can use one of the many best password manager apps for iOS. In addition, if you’re using iOS 11, there’s a built-in password manager that lets you easily manage passwords and accounts.
Final Thoughts
By taking these measures, you’d be able to bypass iCloud activation lock on your iDevice. We recommend you to first attempt the Activation Lock by yourself. If it doesn’t work, use our iCloud unlock service to unlock the device permanently. Apart from that, use Find My iPhone in a smart manner and manage Apple ID passwords to avoid a mess.
That’s it! Try yourself and let us know through your valuable comments.
Update #1 October 2017: The solution was tested and works fine with the latest iOS 9.1 & 9.2 beta firmware.
Update #2 February 2019: The iCloud DNS bypass server was tested and works with 12.2, 12, 11.4.1, 11.4, 12, 11.3.1, 11.3, 11.2, 11.1.2 – 11, iOS 10.3.3 – 10, 9.3.5, 9.3.3 & lower firmware.


