You probably already know that all of the 2018 iPhones were introduced with support for dual-SIM, but none were equipped with the ability of using eSIM on iOS 12 (just the nano SIM physically). But with the release of iOS 12.1, everyone can utilize eSIM on their personal or business plan on iPhone XS Max, XS, or XR. Follow our ultimate guide to adding, activating and using an eSIM line on iPhone XS Max, XS or XR.
Prerequisites for Activating a Secondary SIM line on your iPhone XS Max, XS or XR
Setting up a digital eSIM is confusing for a lot of people because the concept is entirely new. Firstly, a dual-SIM capable iPhone XS Max, XS or XR is needed. Also, you should have iOS 12.1 on your device with eSIM capability.
Your iPhone XS Max, XS or XR also needs to be unlocked if you want to use it on different carriers. If it is not, you can only use it on one carrier – the one you’re currently using. Only Verizon Wireless, T-Mobile and AT&T offer support for the eSIM in the United States but users also have to wait to get an update from the carrier before using it. Sprint said it will provide eSIM support in the future. However, if you need an internet connection when going out of the country, eSIM for data-only web is offered by GigSky.
Another essential thing to know is that that if you use Verizon Wireless or Sprint (a CDMA network carrier) as your primary activated line, your second SIM won’t work with additional CDMA accounts, says Apple. That implies that you’ll need to be on a GSM-based plan as the second plan as long as the device is unlocked. If you purchased the device from Verizon or Apple outright, it should be unlocked, and the same applies to Sprint in specific cases.
Support for Several e-SIMs
While only two cellular plans can be used on the new iPhone models at the same time, when receiving calls or calling someone, only one can be used at a single time. If someone from an opposite plan calls you, their call will transfer to voicemail. This is something that should be kept in mind.
Also, there’s more than a single plan on the new eSIM, but just one can function at a time, implying that all other plans won’t be usable unless you manually switch the existing eSIM plan to another one on the handset.
Using eSIM: Activating Another Line
There’s already probably a cellular plan on your iPhone XS Max, XS or XR, so if you want to add a secondary plan, such as a local data plan from another country, a work account, or an individual data plan because to name a couple of examples, you’ll need your carrier to allow you to scan a QR code, use the app of the carrier, or enter details manually.
However, before proceeding, we advise you to get in touch with your carrier and request them to transfer the existing nano-SIM account to the eSIM so that it is easier to insert a nano-SIM during travel. If that doesn’t apply to you, can you just activate a third or second line directly on the same, such as from a data-only carrier such as GigSky, which caters to the need of travelers.
First Method: Scanning QR code from Carrier
If you buy a secondary plan from the existing or some other carrier – if your iPhone is unlocked – they should give you a QR code through an email or on a receipt that you can just scan to activate a plan.
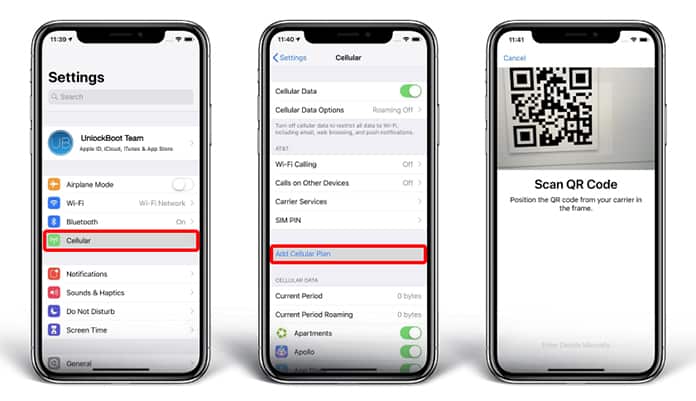
After getting the QR code, launch Settings, tap Cellular > Add Cellular Plan. Moving on, scan the QR code, and that’s all there is to it. You might get a prompt to add a confirmation code, which the provider should give you, so use that if the need arises.
Second Method: Get a Plan Using Your Carrier’s App
In certain instances, you can purchase a second plan using your carrier’s app on your iPhone XS Max, XS or XR. For the popular US-based carriers – the apps are My Verizon, T-Mobile, My Sprint Mobile, and myAT&T. However, others like GigSky, which provide prepared travel-related plans, can also work. All apps function differently, so you’ll have to see how to buy a plan using them. As you proceed, you’ll be able to set up the plan on the eSIM directly.

However, it is not possible to use the Verizon or Spring app to buy a secondary line if you’re already using a CDMA network on the current plan. If you’re using T-Mobile or AT&T as the primary activated line, you can set a CDMA-integrated variant as the second plan with the Verizon or Sprint app, or you can configure another line that’s GSM-based with T-Mobile or AT&T’s app.
Third Method: Entering Information Manually
In the scenario where you don’t have access to the first two option, you can just enter details manually for the second line. Launch Settings, tap Cellular > Add Cellular Plan. Beneath the screen for ‘Scan QR Code’ – tap ‘Enter Details Manually.’
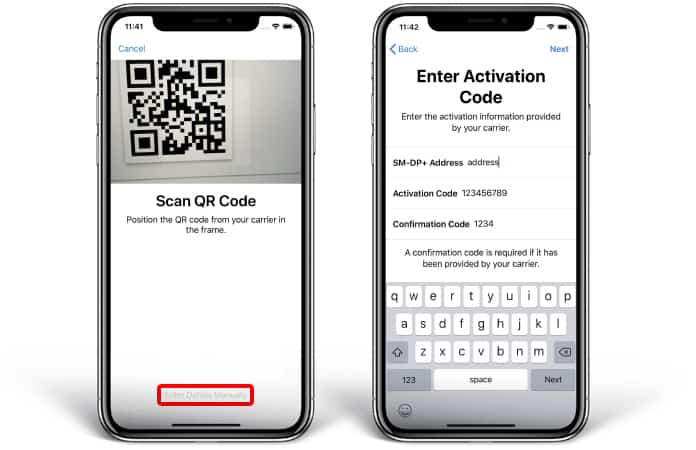
You should have the SM-DP+ address from the carrier. It is the Subscription Manager Data Preparation entity required for encrypting carrier credentials during the OTA (over the air) SIM activation. Also, you’ll require a confirmation and activation code.
Labelling Your Created eSIM Plan
Once the plan is activated, you’ll have to label it so that you can identify what plan is being used on your device, the one you added now and the primary one. You’ll have to select between Secondary, Primary, Personal, Travel, Cell Data or Business, but you can also put in a custom label.
Once done, choose ‘Done’ to finish the setup. It can be changed later in the cellular settings from ‘Cellular Plan Label’.
Select How It Works Along the Other Plan
After labelling your brand new line, you’ll now have to decide how your separate plans work together on the new iPhone. On the screen saying ‘Default Line’, choose one option from the following three.

- As your default line, use [First Plan Name] – [Second Plan Name] is for SMS and plan. This means the first plan sis primary, so it is going to be the default for data, voice, SMS, FaceTime calls, and iMessage. The second is just for SMS and voice.
- As our default line, use [Second Plan Name] – with this option, the [First Plan Name] will be available for SMS and phone. This means the second plan is going to be the primary one, so it’s going to be the default for SMS, data, iMessage, voice, and FaceTime calls. The first plan is for SMS and voice.
- For cellular data only, use [Second Plan Name] – In this case, [First Plan Name] is going to be the default line. The second plan will be used for data in this case, which is ideal for travel-related journeys, and the first plan is going to be the default for FaceTime calls, iMessage, data, and SMS.
After the iPhone is configured for two different plans, you can use both at the same time. In the Contacts application, you can link the ISM account to contacts to keep it default to using the accounts for every person. While making calls, you can decide what line you’ll be using for SMS and iMessages by default, or switch while writing a new message. Enjoy.


