Windows 10 may be new for you and you are looking to enjoy the real functions of iTunes while using Windows 10 or older Win version. You need to confirm that all media libraries and related stuff is identifiable by iTunes. So, you would need to know how to download iTunes on Windows 10. In this article, we are presenting complete step by step details to do so. You just need to have a look in below.

Steps to Download iTunes on Windows 10/8/7 PC
First of all, you need to open your installed web browser which you use for online browsing.
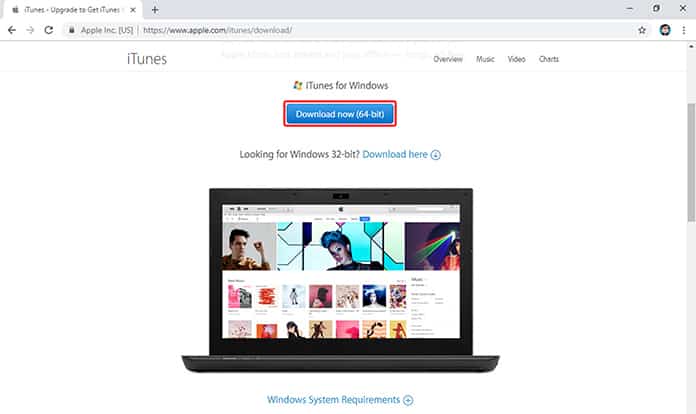
Step 1: Now you need to search for www.apple.com/itunes/download
Step 2: Scroll down a bit and click Download Now.
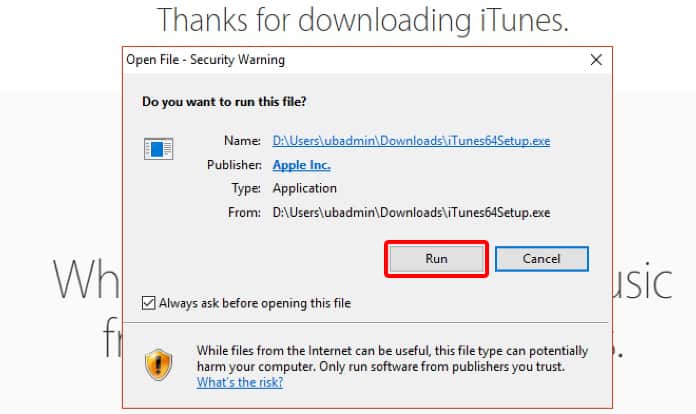
Step 3: Now click on the ‘Save’ icon. After this iTunes will be downloaded.
Step 4: After downloading, click on the setup and click Run.
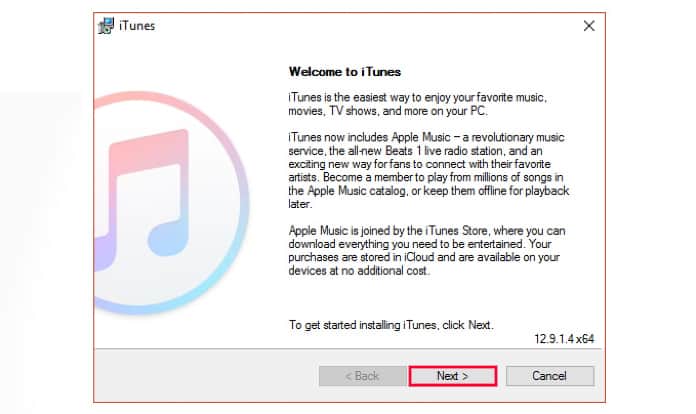
Step 5: Now click Next.
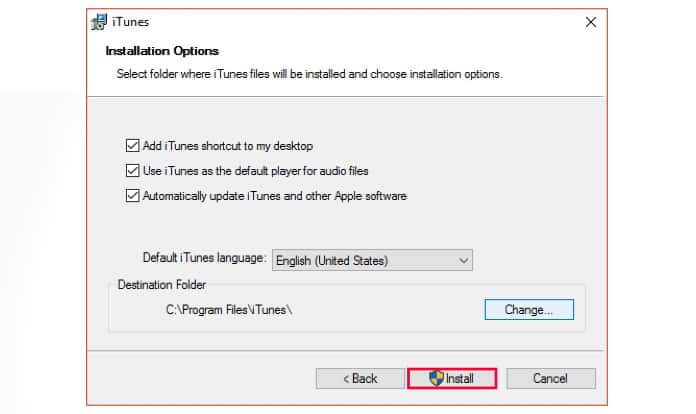
Step 6: You have to check the installation parameters and then click Install.
The installation has been completed. Click on Finish.
See Also: How to Update iTunes on Windows PC
Create an iTunes / Apple ID Account for Logging in on Windows 10/8/7 PC
There is a need of Apple ID whenever you want to buy music and download apps. You can create your Apple Id by following some basic steps on your Windows 10.
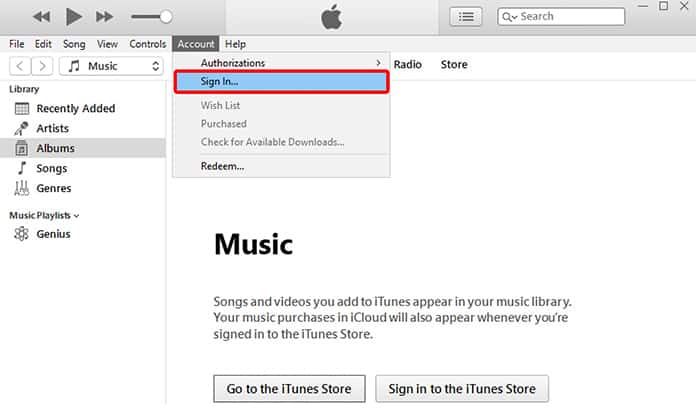
Step 1: First, launch iTunes. Now Click on the Account option from the menu at the top-left corner of Window. Then click Sign In.
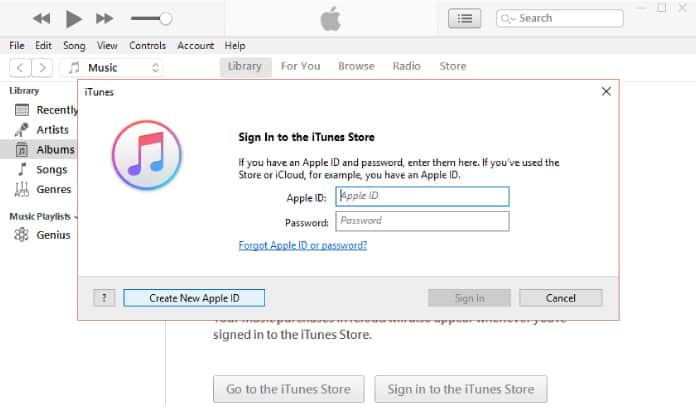
Step 2: At this step, Click Create New Apple ID. In case you already have your Apple ID, then you can directly sign in at this step here.
Step 3: Click ‘Continue’. Now click on the checkbox that confirms ‘I have read and agreed to these terms and conditions’ and then click ‘Agree.’
Step 4: Now you need to enter your email address and provide your password.
Step 5: Type your password again for the confirmation process.
Step 6: Now click the drop-down arrow which is next to Choose One and then select a security question. Provide the secure answer to your chosen selected security question
Step 7: Now click the drop-down arrow which is next to Choose One and then select a security question.
Step 8: Provide an answer to your new selected security question
Step 9: Now click the drop-down arrow again which is next to Choose One and then select a security question. Provide the answer to your recently selected security question
Step 10: Now, you have to click the drop-down arrow which is next to Day and Click a number
Step 11: At this step, click the drop-down arrow next to Month and click a month.
See Also: How to Create Apple ID Without Credit Card
Now Type a year in the Year field and click ‘Continue.’
Steps to submit your complete billing information
After you finished the steps above, now you will need to submit your billing information. For this follow the steps mentioned below.
Step 1: Click a payment option. After that you need to provide your card number.
Step 2: Now just click on the drop-down arrow under Expires.
Step 3: Click the expiry month and click the expiry year.
Step 4: Type your security code. Now click the drop-down arrow next to Title.
Step 5: Click a title and type your first name, last name and address.
Step 6: Now click the drop-down arrow which is next to Province/State. Click your province or state, postal code and area code.
Step 7: Type your phone number and click on Create Apple ID.
After all, an email will be sent to your email address to verify your identity; you need to verify using that verification link. After verification, you have to click OK
Authorize or deauthorize your computer in iTunes on Windows 10 PC
This is another critical step when you want to use iTunes. By authorizing your computer, you will grant the permission to iTunes for accessing the content of your computer. You have to follow some steps.
Step 1: First of all, launch the iTunes button.
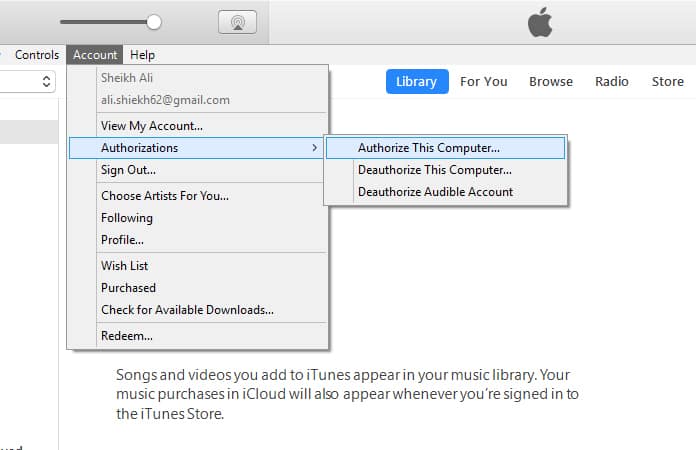
Step 2: After launching, click Account from the menu near the top-left corner of the window
Step 3: Click Authorize This Computer.
Step 4: Type your password. Then click Authorize.
That’s all.
Sometimes when you need to deauthorize your computer, you can do so by following the steps mentioned below.
Step 1: First, launch iTunes on your computer.
Step 2: Click Account from the menu near the top-left corner of the window.
Step 3: Click Authorizations, then click Deauthorize This Computer.
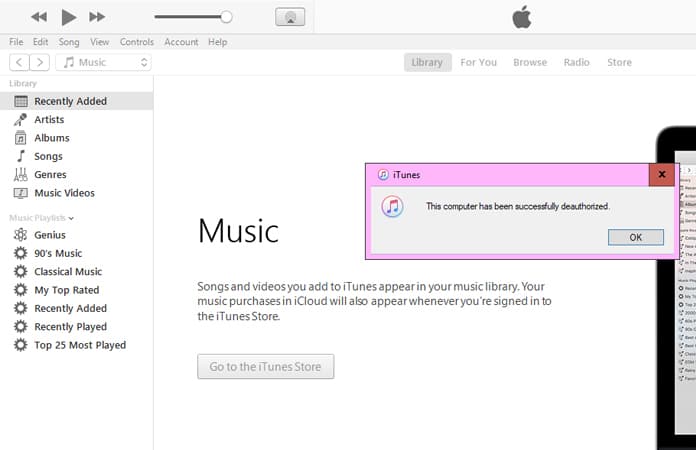
Step 4: Type your password and click Deauthorize.
Importing your media library into iTunes on Windows 10/8/7 PC
Step 1: Launch iTunes then click File.
Step 2: Click Add Folder to Library. Click a file or folder you’d like to import into iTunes.
Step 3: Now click Select Folder.
You need to continue this process to import all of your files in iTunes.
Buy content from iTunes on Windows 10
You can buy a different kind of media from iTunes, and the process is so simple to follow. Have a look at following steps.
Step 1: Launch iTunes and click Store from the menu near the top of the window.
Step 2: Click the price next to an item you’d like to purchase.
Step 3: Type your password and then click Buy.
After that, your selected item will download, and you can easily find it in your Library.


