Aside features like biometric sensors and a touchscreen, modern handsets are equipped with advanced hardware in the shape of various sensors that allows your device to sense the environment it is in. For those who own a Samsung smartphone, chances are, they have a unique built-in feature that enables them to see if these sensors are working fine. Read on to learn how to test Samsung hardware using a secret code.
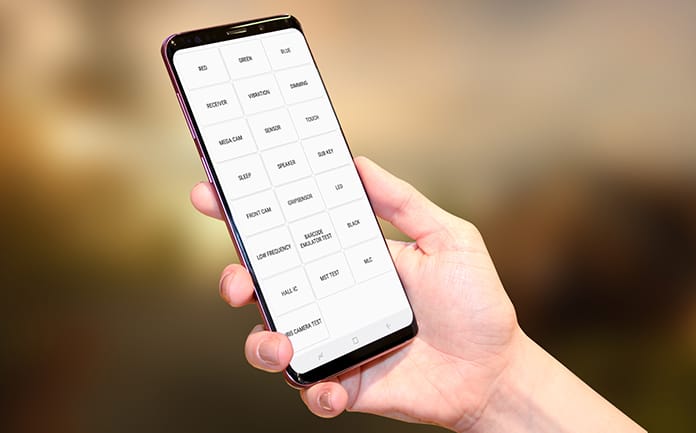
Several Samsung device owners aren’t aware that there’s a secret diagnostic mode built into the Galaxy range by Samsung. Anyone can access it by inserting a little code. The feature is easy to access and offers a route to testing out a second hand or a new phone to ensure it is in good health before you commit to purchasing it.
Secret Diagnostic Menu: How to Access It?
Before we start, we should inform you that the feature may not be present on your handset. Specific carriers, including Sprint and Verizon, are known to block the diagnostic code-based mode on the Samsung tablets and smartphones they sell, though some models from Sprint like the Galaxy S6 have this function restored.
To start, open the phone app on your Samsung device. Next, use the dial pad and enter *#0*# to go into the secret diagnostic mode. It’s an automatic process, so the user doesn’t need to press the green call button for the command to work. If you’ve entered the code, and nothing happened, the feature is deactivated on your handset.
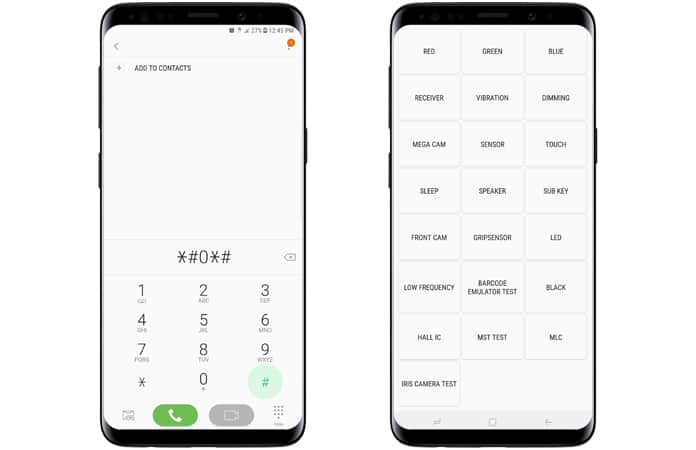
Below are some tests you can conduct once you’ve entered the code and your Samsung device has entered “HwModuleTest” mode. Some test-related screenshots are missing in the compilation below do to the nature of the tests or because of security reasons.
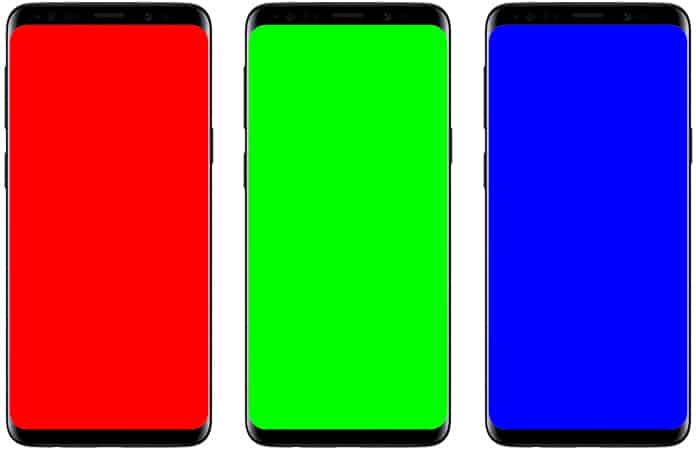
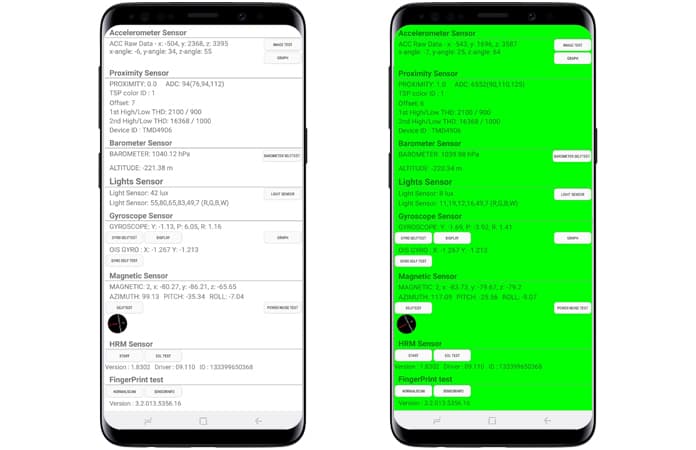
Green, Blue or Red Screens
Choosing any of the three tests checks for the phone’s green, blue and red color spectrums, and the corresponding colors will show when selected. Tapping on the screen will exit the test and take you back to the primary diagnostic page.
Dimming
Those who tap on “Dimming” will be taken to a blue, red, and green screen. The screen then switches between brightening and dimming whenever it’s tapped. Pressing the “volume up” button takes users back to the primary Samsung test page.
Receiver and Vibration
To see if the receiver is functioning well, conduct testing for it by tapping the “Receiver” button. After you do, you’ll arrive at a white screen and hear an audible dial tone. Go back to the main test page. By tapping the back button twice after you’re satisfied. The phone’s vibration motor can also be tested through the “vibration” button, tapping which leads to an ongoing vibration. Exit this test by tapping this screen once and head back to the primary test screen.
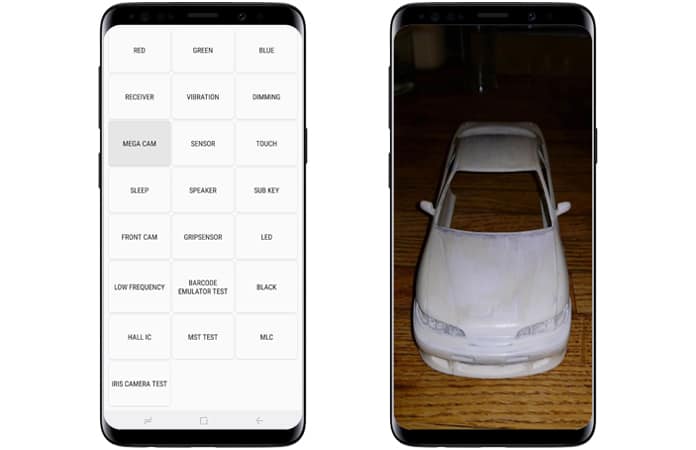
Mega Cam
Users can test the main camera of their devices by tapping “Mega Cam.” Press volume buttons to zoom out and zoom in, then go the screen’s bottom and tap the camera button to take an image. The flash is activated by default, and the test photo gets saved in Gallery. After the camera testing is done, head back to the diagnostic screen by tapping the back button once.
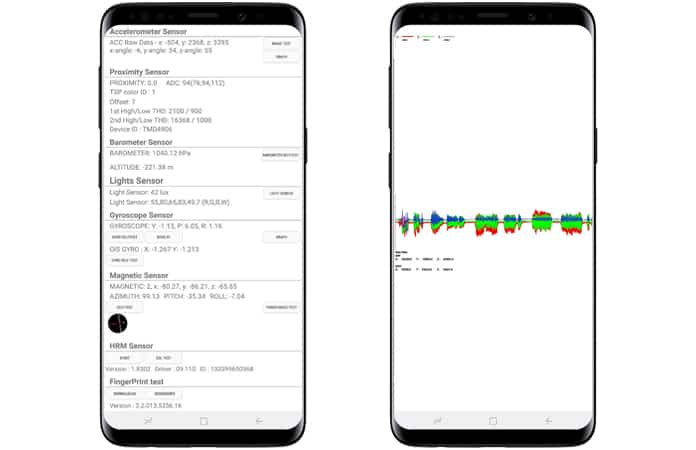
Test Samsung Sensors
This button can be taped to see a test page for a range of sensors – including barometer, accelerator, magnetic sensor, gyroscope, and more. Let’s go over the main submenus under sections.
Accelerometer
Accelerometers are crucial sensors that enable users to identify the device’s orientation, commonly measuring their acceleration of movement (linear). Its functionality can be tested by tapping “Image Test” to see landscape-to-portrait happens. Another way is to use a graph to measure how accurately the movements are being detected by a sensor when the device is shaken up and down.
Gyroscope
Gyroscope always measures the rotation of a smartphone and functions alongside an accelerometer to paint a total picture of casual movement. The handsets gyroscope can be tested in several ways – a test can be manually performed by tapping on either “graph” or “display,” or the user can rotate their device around and rest the corresponding results either via a linear graph or in numbers.
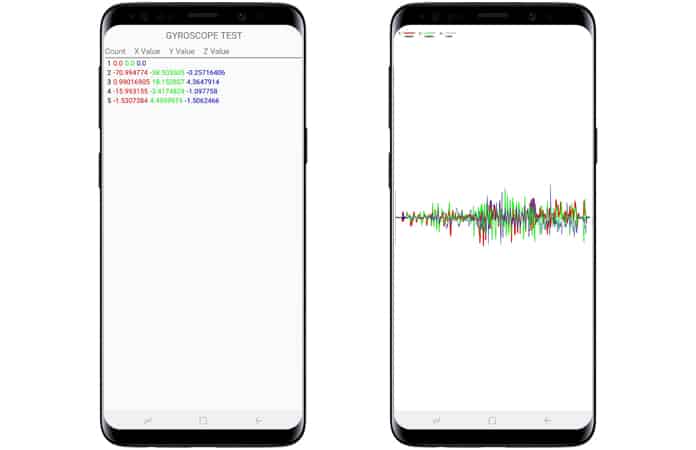
Alternatively, device owners can select “Gryo Selftest” for y and x axis to test the gyroscope function automatically.
Light Sensor
As the name depicts, the sensor is responsible for detecting light (ambient). The test can be initiated by tapping “light sensor.” Next, the phone needs to be exposed to lights of different levels of brightness. Three levels should then register, starting from dim (level one) to extreme brightness (level three).
Proximity Sensor
This tests the proximity sensor of Galaxy handsets. The proximity sensor is tasked with the responsibility of switching off the screen whenever the phone is placed against the user’s face during calls to stop accidental touches. Users just need to cover the top of their phone with their hand to test this feature.
The screen should become screen if the proximity sensor functions, so uncover it to go back to the white screen and launch another test.
Magnetic Sensor
The test sees the functioning of the magnetic sensor of a handset. Tap “Selftest” to launch an automatic test to see if the device fails or passes. If you want to conduct manual testing, tap “Power Noise Test,” then around the phone run magnet. For instance, the magnetic sensor is situated on the to-left corner on Galaxy S8. Wait for magnetic spikes to appear when a magnet is close to magnetic sensors.
Barometer
The sensor is mostly used for tracking altitude. However, it also helps users with GPS readings (by increasing their accuracy). Testing is straightforward” tap “Barometer Selftest” to launch an automated test that instantly lets users know if it is working correctly or not.
Heart rate monitor (HRM)
This tests analyzes the heart rate monitor of your smartphone and can be performed in two different ways. The first way requires you to tap the “start” button inside the HRM tab after which you’ll go to the HRM test page. There, placing the finger on the sensor will enable you to test the handset’s heart rate monitor.
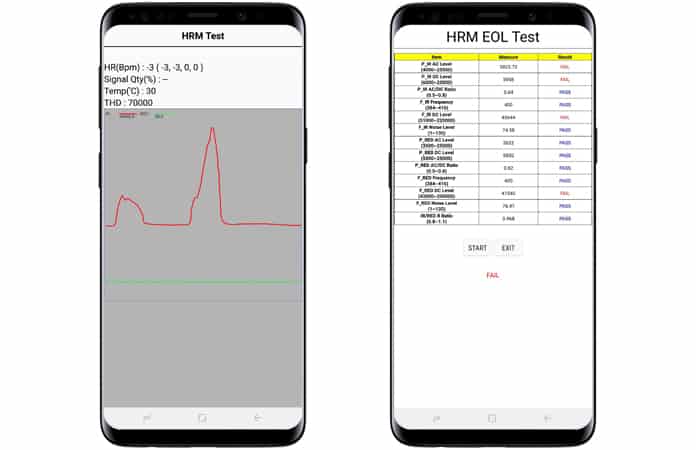
Those who want to launch the “HRM EOL” test will need to place the device on a flat services and keep it still, otherwise it can register multiple times.
Fingerprint Sensor
This test is known to test the fingerprint scanner. Tapping “Normal Scan” should start testing, which takes place automatically to detect if all components are in perfect condition. To reveal information such as firmware version, tap “Sensor Information.”
Sleep and Speaker
When you tap “Sleep,” you’ll be able to test the sleep functionality. Conducting this test places your device in sleep mode. Then, wake the device as you normally do, and you’ll automatically land on the main diagnostic page. To test the audio output of your handset, tap the “Speaker” button to play a simple song that can be listened to. Once you’re satisfied with the speakers, tap “Speaker” again to close the test.
Touch
The touchscreen is the most vital part of any handset, and is needed to interact with the phone. So to see if there are any dead zones and check for proper functionality, tap “Touch screen” to get started. Next, complete the box (X marked) by tracing the squares on the screen, which should start becoming green.
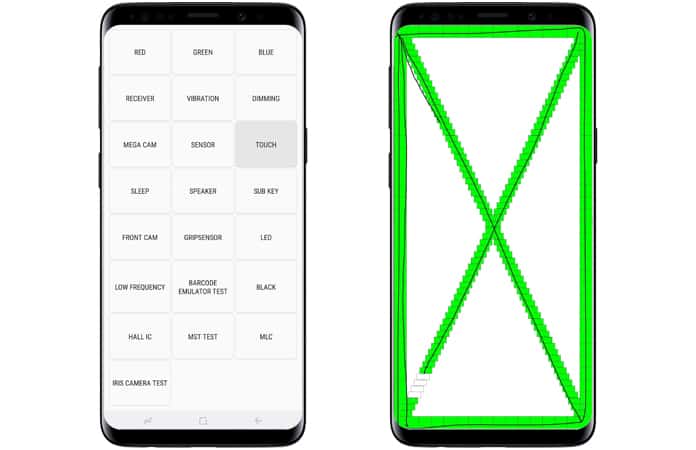
After you’re done, you’ll arrive at the main test page. Alternatively, the volume up button can be pressed to head back to the main test Samsung page.
Sub Key
Sub Key plays the role of testing hardware buttons, along with virtual home buttons if you have S8 or Note 8. Pressing each button will modify the color of the screen to verify each one’s functionality. Tapping the “exit button” at the screen’s middle will take you back to the main diagnostic page.
Front Camera
For testing the front camera, all users have to do is tap “front cam” button. That pulls up the front camera and enables them to take a selfie like they’d in a normal situation. However, it should be noted that any photos snapped during the tests will be saved to the gallery, so delete them if you intended to use them just for testing. Once the selfie cam test is done, tap on the back button twice to open the main testing page.
Gripsensor
Perhaps your Samsung device is equipped with sensors that identify your grip. For testing its functionality, tap the button that says “Gripsensor” and follow the on-screen instructions. Leave the grip when prompted. If the grip sensor is working well, a blue screen labeled “working” should appear. Once done with the test, tap twice the back button to go back to the diagnostic screen.
Getting out of HwModuleTest Mode
After the diagnostics tests are complete, the HwModuleTest can be exited. This can be done by tapping the back button two times to go back to the dialer of the device, then exit from there like you do in normal routine. Then, you can proceed with the rest of the day, knowing about everything that is right (or wrong) with your precious Samsung device.


