We’re all well aware of the process of taking a screenshot when it comes to either your Mac or an iPhone which is by holding the power button and home button together. However, taking an Apple TV screenshots is not an easy task and is definitely not as simple as holding a couple of buttons. However, we can be grateful to Apple for at least providing the screenshot this time because it wasn’t there before. An example is the Apple TV 3 which was not equipped with the capability to take a screenshots. Luckily, we have found two ways to take screenshots on Apple TV and we are going to explain them in this article.

2 Methods to Take Screenshots on Apple TV
However, the latest Apple TV 4 can take a screenshot. As I mentioned earlier it is not a simple process making this happen so in order to take an Apple TV screenshot, the first thing you will require is a Mac and a USB type-C to USB type-A cable. The essential two methods to take screenshots on Apple TV 4, 3 or 2 are by either taking the help of Xcode or just not take the assistance of Xcode. Without any further ado, let’s go through both the ways.
How to Take Screenshots on Apple TV using QuickTime
The process we have explained will be the same for video recording when taking a screenshot on Apple TV 4, 3 or 2 and it makes use of Mac’s native QuickTime app.
Step 1: Open QuickTime player on your Mac.
Step 2: Now connect it to your Mac using USB-C to USB A cable.
Step 3: On your Mac’s QuickTime player, go to File menu and tap on New Movie Recording.
Step 4: Tap on the “v” icon located near a gray and red record button.
Step 5: You’ll have a list of options from which you’ll choose Apple TV for both: Camera and Microphone.
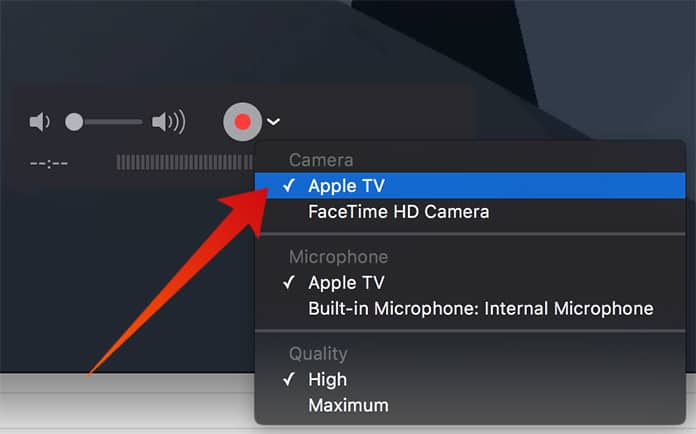
Step 6: Now you’ll see the Apple TV feed on your Mac screen.
Step 7: Tap on the recording button to start video recording.
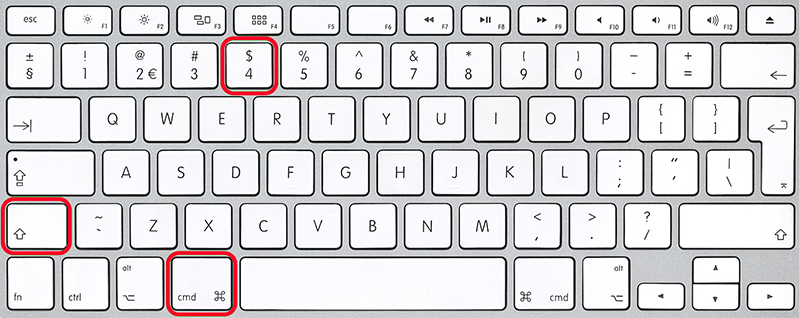
Step 8: Select Command-Shift-4 and then hit the space bar to take a screenshot. This will transform your cursor to the camera icon.
Step 9: Navigate your cursor to the window until the title bar and recording interface disappear.
Step 10: Now select trackpad or mouse to take a screenshot on Apple TV.
Read Also: How to Control Apple TV from iPhone Running iOS 11
How to Take Apple TV Screenshot Using Xcode
- The very first step is to install Xcode on your Mac.
- You must now connect your Apple TV to your TV.
- After the above step, connect your Mac to the Apple TV using USB type-C to USB type-A cable.
- Go and open Xcode on your Mac.
- When you are on Xcode, navigate to the Windows menu.
- You must now select the Devices option and click on Apple TV from the list of devices.
- Finally, all you have to do is click the Take Screenshot option.

That’s pretty much it, folks. The screenshot you have just taken will be saved in a 1920×1080 resolution, regardless of the resolution on your display, on your Mac in the desktop folder. This is by default so there’s nothing we can do about it.
Read Next: How to Jailbreak Apple TV
Share with us your favorite TV show or Movie, Apple TV, screenshots in the comments below?


