We just came across a stellar iPhone camera-leveling option. The great thing about this feature is that it can be used to capture perfect images from an overhead view with great ease. Hence, a tripod doesn’t have to be used anymore just to take an image of something or scan a document flat on ground. Sounds cool? Let us show you how it can be activated and how the camera level tool can be used on iOS 11 whether its iPhone or iPad to take flawless and symmetrically centered images. So, if you are ready to learn how to use camera level tool on iPhone and iPad follow the steps below.
Using gyroscopes of iPhone, the level tool assists in finding if the subject is leveled ideally in the background. And once the bird’s eye view of the subject comes, a balanced shot can be captured.
Steps to Enable Secret Camera Leveling Feature on iOS 11
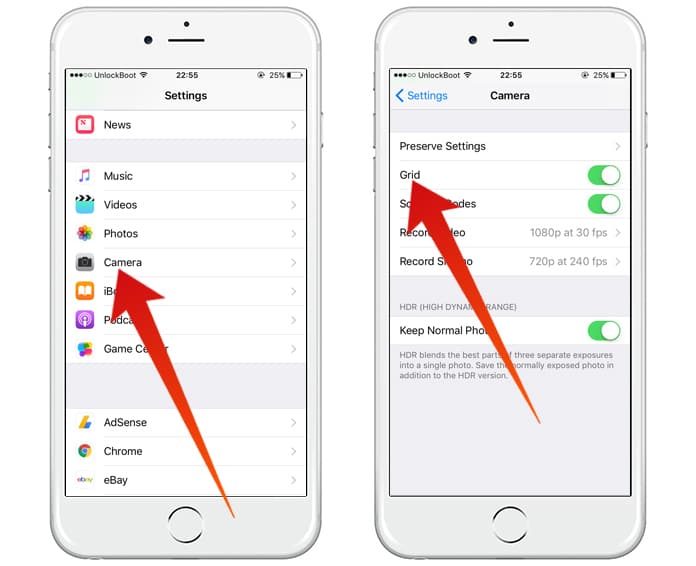
First things first, activate Grid in Camera’s Settings, then follow these steps.
- Open “Settings” app.
- Scroll down and tap on “Camera.”
- Now, activate the switch that’s beside “Grid.”
How to Use Camera Level Tool on iPhone or iPad in iOS 11
Note: The feature is going to run in Timelapse, Square, Portrait and Photo mode. Paranoiac and Video modes aren’t supported at the moment.
1. Launch “Camera” app on your device.
2. See the 9 box grid overlaid. A few crosshairs in the screen’s middle will also be viewable; one will be floating, one may be fixed. They look as if they’re “+’ icon. Next, the camera needs to be move for perfect alignment of the two icons.
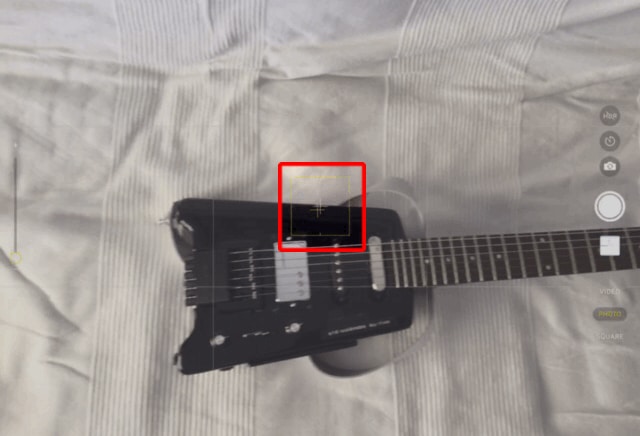
3. When the plus icons are on each other in good alignment, they’ll look bold and will be yellow after some time. That says that the image is now parallel with the ground.
Right as they turn yellow, consider that as your opportunity to take the shot!
Your thoughts?
Make use of this helpful tool if you want to take images from top down view seamlessly. We’d love to hear your thoughts in the comments section below.


