Apple’s Worldwide Developers’ Conference (WWDC) was just held, and Tim Cook’s team has unveiled a lot of new Apple products and services. Apart from everything, Apple’s popular operating system for their iPhones, iPads and iPod Touches made quite an appearance at the show. The iOS 11 beta has been unveiled, and a developer preview is now circulating among the enthusiast Apple users. Yesterday we posted a guide to download and install iOS 11 beta on your iDevice, but today we are going to teach you how to downgrade iOS 11 to iOS 10.3.3 on your iPhone or iPad.

Although it’s quite a great update, a lot of people seem to not like it anymore because it’s still in beta version. There are a bunch of visual changes, quite unwelcoming as many hardcore Apple users are claiming them to be. For example, the network bar looks kind of like vanilla Android now and the notification bar has gone through some major revamp as well.
So if you are regretting the decision of updating your iDevice to version 11 beta being driven by emotion and want to roll back to your previous version of iOS 10.3.3, here’s how you can do it.
Downgrade iOS 11 to iOS 10.3.3 on iPhone, iPad or iPod Touch
Downgrading back from iOS 11 to iOS 10.3.3 is quite easy, though. Apple knows a lot of people would not initially like the Beta release of iOS 11 so the official rollback can take place through the iTunes software. There’s one major drawback though, anyone rolling their iOS like this will not have the option to restore any iCloud or iTunes made on iOS 11. There are version compatibility issues and this is understandable. iOS 11 has only been out for a few hours and even if you have started using it, chances are you will not have major backups to make using iOS 11 Beta.
Follow the steps below to downgrade iOS 11 to iOS 10.3.3 firmware:
Step 1: You need to have latest software and drivers on your PC. Download the latest version of iTunes from Apple’s website. If any driver on your PC is showing signs of trouble, especially Chipset and USB, you may want to resolve that first.
Step 2: Next, the IPSW files for the device you currently use are needed. The iOS 10.3.3 IPSW file is quite easy to find, also we have found this link for you. Download the right version for your respective Apple device.
Step 3: Before proceeding, turn off Find my iPhone in your device first. Otherwise, the device might be treated as stolen as you try to downgrade the OS. To do so, open Settings and navigate to iCloud -> Find my iPhone and toggle the switch to Off position.
Step 4: Connect your iPhone to your PC with iTunes open. Initiate putting the iPhone into DFU mode by holding down the power and home buttons for 10 seconds, the release the power button first but keep the home button pressed. In iPhone 7, press the volume down button instead of the home button. iTunes should show a notification about your iPhone getting into DFU mode.

Put your iPhone in DFU mode to downgrade iOS 11 to iOS 10.3.3 firmware
Step 6: Now, hold down the option key for Mac or Shift key fro Windows and click Restore iPhone. Then select the previously downloaded iOS 10.3.3 IPSW file.
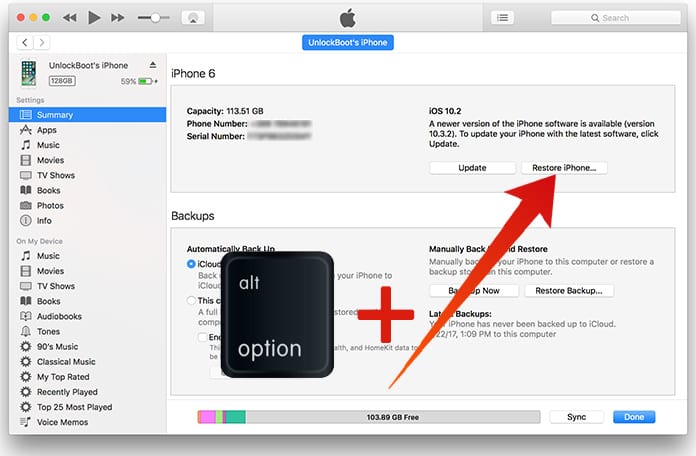
Click Restore iPhone to Downgrade from iOS 11 to iOS 10.3.3
Step 7: iTunes will begin the process of installing iOS 10.3.3 or 10.3.2 onto your iPhone instantly.
Once done, the iPhone will start like a new iPhone. You need to proceed to the activation and data restoring process.
Conclusion
The process is very easy, however there’s a thin chance of bricking your iPhone. If that happens, simply restore using iTunes Restore feature.


