Well transferring photos from your iPhone to your PC, either Mac or Windows one can be quite easy and tedious at the same time depending on how you perceive it. You can use the easy way of syncing your PC and transferring files via the pre-existing app on the iPhone or you can further enlist services of next-gen options like iCloud or more. Read on to learn how you can easily move photos from iPhone to PC or Mac.

We here would be casting our eyes on some of these essential ways as to how you can move your photos from the iPhone to the PC or Mac. Join in as we brief you about all existing options on it. Let’s deal with this one at first, shall we?
How to Transfer or Move photos from iPhone to Mac
- Start off by connecting your iPhone to your computer with the help of the USB cable.
- Upon connection of USB cable to the computer, the Photos app will open automatically on your Mac. However, if it doesn’t open, you can open the applications folder on your Mac and select open the Photos app.
- Select the option ‘Import’ placed at the top. Then proceed to select ‘Import all new items’. However, if you only want to move certain selected photos, then click on those specific photos and then select ‘Import’.
- That way your photos will be moved to your Mac. You can then view it by selecting the Last import on the sidebar.

If you’re one of those Windows PC guys, then you should resort to this way.
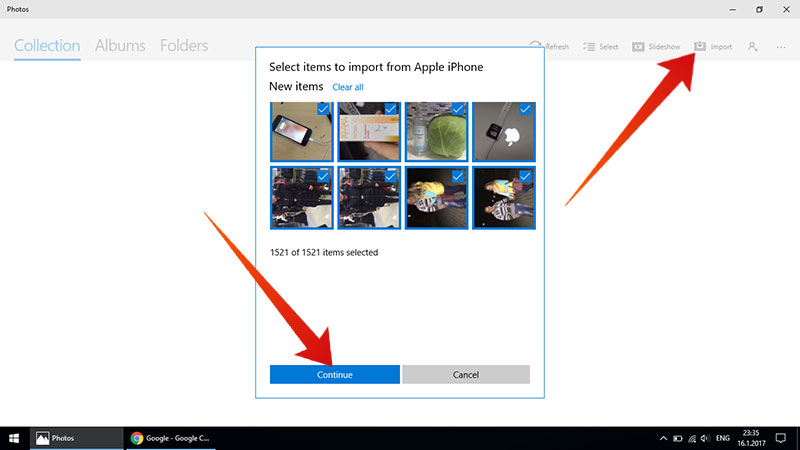
How to Move Photos from iPhone to Windows 10/8/7 PC
- A Windows PC with an older operating system as of like Windows 10, 8, 8.1 or 7 will automatically display the pop-up where you can choose the ‘Tap to Open’ option.
- As for the ones with Window 10, it has a lot to offer and has an inbuilt Photos app similar to that of Mac.
- All you need to do is plug your iPhone with a USB Cable and the Photos app shall automatically connect or launch your phone. However, if it doesn’t then you can launch it via the Windows Start Menu or the search bar.
- Proceed to click the ‘Import’ option placed at the upper right corner of the app. A pop-up box will appear that shall help you select the photos that you want to transfer.
- Another pop-up box shall also appear stating where the photos will be saved on your PC. Here you can change the location where the photos shall be saved.
- Click on the ‘Import’ after finalizing the chores and your photos will be imported. You can then look at them via the Collections menu or the Album icon as per your liking.
After you move the selected photos from your device, you can delete the photos from your iPhone to free up space.
Transfer iPhone photos via iCloud Photo Stream

This one works as a cloud storage option and allows you to download the photos on your Mac or PC by accessing the iCloud Photo Stream. To do that, sign into your iCloud account and navigate to the iCloud photos section. Select the images you want to download and save them on your PC or Mac.
This method can be used to access your photos from your Android device or any other device.
Using Airdrop to Import the Photos
Airdrop works between any Apple devices and will allow you to import photos to your Mac. It works quite easily and is a great option to have. Just select the photos and import via ‘Airdrop’ option.
That’s all from us on this one. We’ll be back with another one the next time. Till then, adios.


