As we’re all well aware, Apple is strict when it comes to security. If it says the limit of authorizing and deauthorizing is over. You will need to learn how to deauthorize iTunes on a dead computer. This process can be a bit complex but we will try our best to keep it simple and easy for you to manage.

Whenever you buy any digital content in the iTunes Store, App-Store or iBooks Retailer, you can access it from your computer. Only if it has been authorized to make use of your iTunes account. You can approve a maximum number of 5 computers as the need determines. But it also means that everyone using that computer can access your purchased content.
Therefore it’s advisable to deauthorize the computers that you no longer use or which are going to be sold. After you learn how to deauthorize iTunes on a dead computer, you can free up your authorization slot. (Remember you may authorize an Apple ID up to 5 computers).
How to Deauthorize iTunes on a Dead Computer from Other Authorized Computer
- Open iTunes Store on your MAC or PC.
- If you’re not signed into the iTunes store then click the Account button after which you should enter your account name and password.
- Click the Account button again, enter your password, and then click View Account.
- In the Account Information window, click Deauthorize All.
There is a limit on how many accounts you can have linked at one time. Generally, the step followed in order to deauthorize is by working on each iTunes account through the installed iTunes software. In which case the only way to deauthorize the ones you want is by resetting your account and then adding the ones you own back again.
You have to authorize your computer before you can have access to all content on the App Store. Also, your purchased content which can range to movies, TV Shows, music, eBooks, audiobooks, and apps. The maximum limit is having 5 authorized computers tied to your Apple ID at the same time.
How to Deauthorize iTunes on a Dead Computer From a New Computer
You must first launch the version of iTunes installed on your computer and apply any updates if necessary.
Step 1: Sign into your iTunes account by clicking on the log in button.
Step 2: Type in your security information and then click the Sign In button.
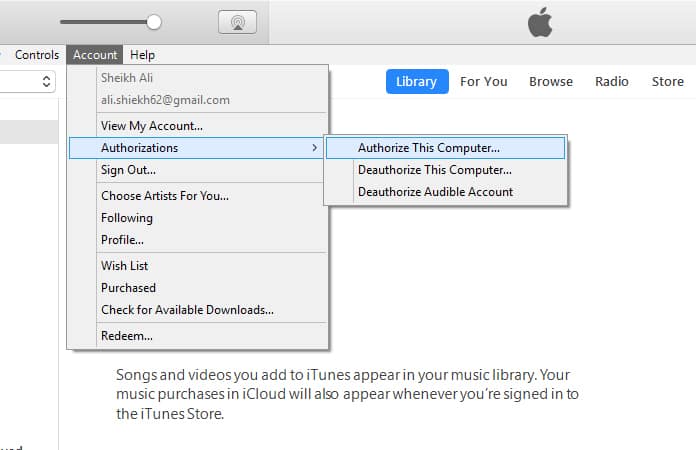
Step 3: Click the Account Tab next to Controls Tab and then choose the Authorization option.
Step 4: Now type in your password again to access your private information.
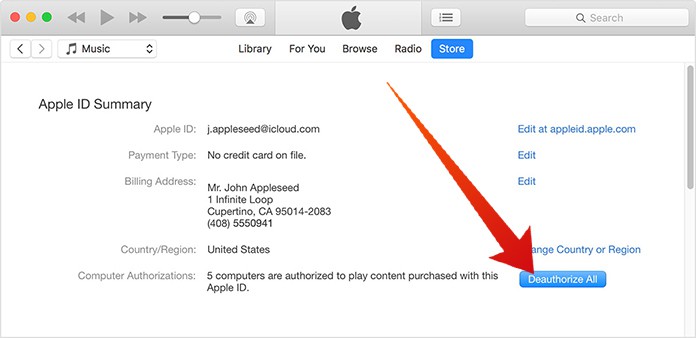
Step 5: Look in the Apple ID Summary section.
Step 6: Click the Deauthorize All button. This will only be available if you have at least 2 computers linked to your account.
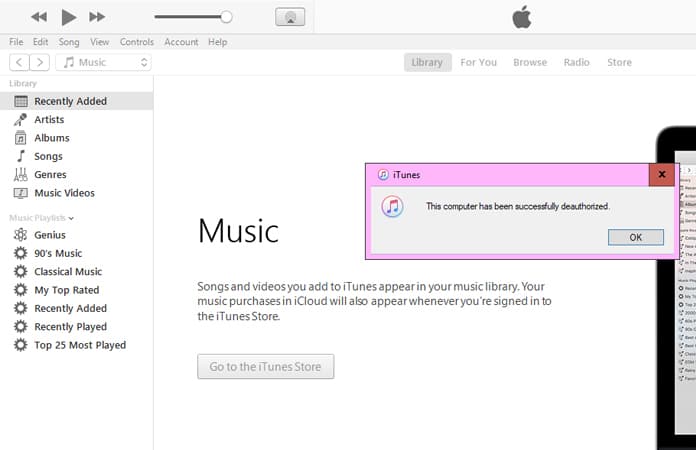
Step 7: A message should now be displayed that all computers have been removed.
Read Also: How to Restore Deleted Apps on iPhone
We hope this tutorial on how to deauthorize iTunes on a dead computer has been helpful and if by chance you happen to face any difficulties in the process, feel free to reach us out in the comments and we will assist you!
")


