Do you want to remove email account from iPhone? Whether you changed email address or an email provider closed down, or you don’t want to be disturbed by emails anymore, you can easily remove an email account from iPhone or iPad by following a few simple steps.

But know that once you remove email account from iPhone, all the data will be wiped from your iDevice, including all credentials like drafts, mailbox content, login details, mail settings, as well as notifications and alerts that were associated with your account.
Therefore, be sure that you want to delete email account from iPhone; otherwise, you may end up deleting something that you wanted to have presented on your iDevice.
Steps to Remove Email Account From iPhone or iPad
It is the same process on all iDevices, though some things may appear different. Here’s how to remove email account from iPhone as well as the associated inbox.
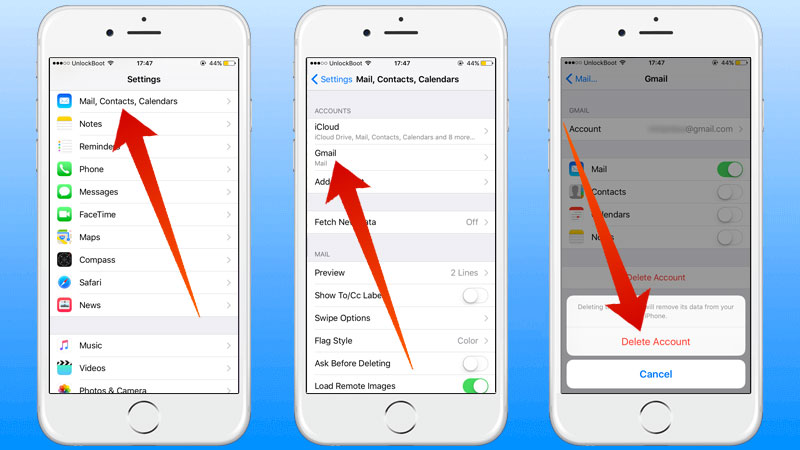
- Go to “Settings” and select “Mail, Contacts, and Calendars.”
- In “Accounts”, choose the email account you want to remove.
- Confirm the account/email address has accuracy, then tap “Delete Account” in red, and provide confirmation when asked for again.
This is what the removal panel and account settings appear like in modern iOS versions.
Delete email account on iPhone and Remove emails
If you run an older iOS version, follow the same steps to delete email account from iPhone or iPad.
After you go back to the Mail app, your email account won’t be there, and there will be no options to send an email from that account. You don’t face much harm once you remove email account from iPhone because it is always possible to revisit it. Messages are stored on a remote server and can be accessed again after you add the account again.
Read also: How to Forward iCloud emails to another email
Therefore, removing an account removes messages from the device, not the mail server. As long as no one deletes those messages on the latter, you can always access them at a later date.


